That first crackle of black food coloring hitting white cream cheese frosting — the way it blooms into this deep, inky swirl — still takes me straight to my tiny apartment kitchen five years ago. I was desperately trying to make something, anything, Halloween-themed for a friend’s costume party, and I had exactly three ingredients in my pantry. Oreos, cream cheese, and white chocolate melting wafers. Honestly, I almost gave up and brought a bag of candy corn instead. But then I crushed those cookies into a fine, dark dust, mixed it with the soft cheese, and rolled the first little ball between my palms. It felt like making mud pies as a kid, but somehow, it turned into something magical. That night, those little black truffles disappeared faster than the punch, and someone actually asked if I’d bought them from a bakery. I laughed, because the truth was almost embarrassing in its simplicity. This is that recipe — the one that proves you don’t need fancy skills or a million steps to create something that looks and tastes like you spent hours. It’s just you, a few pantry staples, and a little bit of kitchen witchiness.
Why You’ll Love This Recipe
Let’s be real for a second. Halloween treats can be a total pain. Between carving pumpkins and wrangling excited kids, the last thing you need is a complicated baking project. These Easy Black Cat Oreo Truffles are the opposite of that. They are the dessert you make when you want maximum impact with minimum effort. And honestly, they taste way better than anything store-bought.
- No-Bake & Ridiculously Easy : You don’t even turn on the oven. If you can crush cookies and roll balls, you can make these. They come together in about 20 minutes of active time.
- Simple Ingredients : Oreos, cream cheese, and melting chocolate. That’s it. No weird extracts, no specialty flours, no trips to three different stores.
- Perfect for Halloween Parties : These little black cats are the star of any spooky spread. They look adorable on a plate next to our Halloween charcuterie board, and they’re easy for little hands to grab.
- Crowd-Pleaser : I’ve brought these to potlucks, work parties, and family gatherings. Kids love the cute cat shape, and adults love the rich, fudgy flavor. They vanish every single time.
- Unbelievably Delicious : The texture is this perfect mix of creamy and crunchy. The Oreo crumb gives it a deep, almost chocolate-malt flavor, and the cream cheese keeps it from being too sweet. It’s the kind of truffle that makes you close your eyes after the first bite. It’s comfort food reimagined — festive, fun, and with the same soul-soothing satisfaction as a classic no-bake cookie.
What Ingredients You Will Need
This recipe uses simple, wholesome ingredients to deliver bold flavor and satisfying texture without the fuss. Most of these are probably in your kitchen right now. Here is what you need to make these little black cat truffles.
- Oreo Cookies (1 standard 14.3-ounce package) : The star of the show. You will use the whole cookie — filling and all. I recommend using regular Oreos, not the Double Stuf or Thins. The regular ratio of cookie to cream is perfect for getting the right texture. For best results, crush them into a fine crumb using a food processor. If you don’t have one, put them in a ziplock bag and go to town with a rolling pin. Just make sure there are no big chunks left.
- Cream Cheese (8 ounces, softened) : This binds the Oreo crumbs together and gives the truffles that rich, creamy center. It is crucial that the cream cheese is at room temperature. Cold cream cheese will leave you with lumpy truffles that are hard to roll. I always use full-fat Philadelphia cream cheese for the best flavor and texture. Low-fat versions have more water and can make the mixture too sticky.
- Black Candy Melts or White Chocolate + Black Food Coloring (12 ounces) : This is how we get that sleek black cat look. You have two options here. The easiest route is to buy pre-colored black candy melts from a craft store or online. They melt smoothly and dry with a nice shine. Your second option is to use white chocolate melting wafers and color them black yourself. If you go this route, you need to use an oil-based black food coloring. Water-based coloring will seize the chocolate and turn it into a grainy mess. I personally use the Wilton Color Right system for a deep, true black.
- Black Sprinkles or Black Sanding Sugar (optional, for decoration) : A little extra sparkle makes these truffles look even more festive. I like using black sanding sugar for a subtle shimmer. You can also use black jimmies or little candy eyes for a more detailed cat face.
- Mini Chocolate Chips or Candy Eyes (for the faces) : To make these look like actual black cats, you need to add little faces. You can use mini chocolate chips for the ears and eyes, or you can use those little white candy eyes with black pupils. I prefer using mini chocolate chips because they are easy to press in and they look like cute little cat ears.
Equipment Needed
You do not need a ton of fancy equipment for this recipe. That is part of the beauty of it. Here is what you will need.
- Food Processor : This makes quick work of crushing the Oreos into a fine powder. If you don’t have one, a sturdy ziplock bag and a rolling pin work just fine. It takes a little more elbow grease, but it gets the job done.
- Electric Hand Mixer or Stand Mixer : You need this to beat the cream cheese until it is smooth and fluffy before adding the Oreo crumbs. A wooden spoon works in a pinch, but it takes a lot of arm strength to get it really smooth.
- Mixing Bowls : One large bowl for the truffle mixture, and one microwave-safe bowl for melting the chocolate.
- Baking Sheet : Line it with parchment paper or a silicone baking mat. This is where you will place the truffles to set after dipping.
- Small Cookie Scoop or Melon Baller : This helps you get evenly sized truffles. It makes the rolling process much faster and more consistent.
- Fork or Dipping Tool : For dipping the truffles in the melted chocolate. A regular dinner fork works great. You can also buy special candy dipping tools, but honestly, a fork is all you need.
Preparation Method
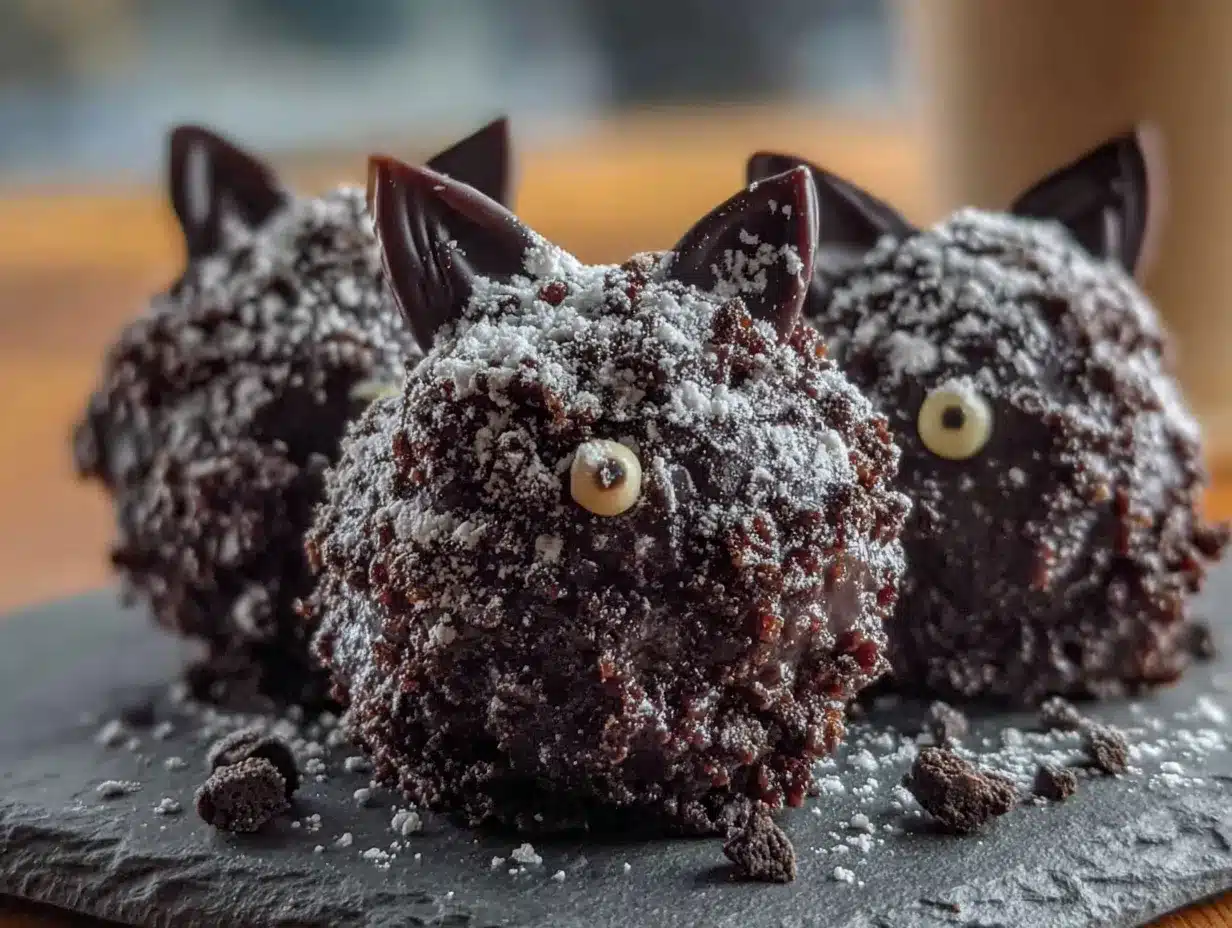
Alright, let’s get rolling. This is where the magic happens. Follow these steps, and you will have a batch of adorable black cat truffles in no time.
- Crush the Oreos : Place the entire package of Oreos (filling and all) into your food processor. Pulse until they turn into a fine, dark crumb. You want it to look like black sand. No big chunks allowed. If you are using the ziplock bag method, really go for it. You want a consistent texture.
- Beat the Cream Cheese : In a large mixing bowl, beat the softened cream cheese with an electric mixer on medium speed until it is completely smooth and fluffy. This takes about 2 minutes. Scrape down the sides of the bowl once or twice to make sure everything is incorporated.
- Combine : Add the crushed Oreo crumbs to the bowl with the cream cheese. Mix on low speed until everything is fully combined. The mixture will look like a thick, dark, slightly sticky dough. It should hold together when you press it between your fingers. If it feels too dry, add a teaspoon of milk. If it feels too sticky, add a few more crushed Oreos.
- Chill the Mixture : Cover the bowl with plastic wrap and pop it in the refrigerator for at least 30 minutes. This step is non-negotiable. Chilling the mixture makes it much easier to roll into balls without it sticking to your hands. You can even chill it for up to an hour if you have the time.
- Roll the Truffles : Once the mixture is firm, use a small cookie scoop or your hands to roll it into 1-inch balls. You should get about 24 truffles from this recipe. Place the rolled balls on a parchment-lined baking sheet. If the mixture starts to get sticky as you work, pop it back in the fridge for 5 minutes.
- Melt the Chocolate : Place your black candy melts or white chocolate wafers in a microwave-safe bowl. Microwave in 30-second intervals, stirring well after each interval, until the chocolate is completely smooth and melted. Be careful not to overheat it, or it will seize. If you are using white chocolate and coloring it, add your oil-based black food coloring a drop at a time until you reach the desired shade.
- Dip the Truffles : This part is a little messy, but it is so satisfying. Using a fork, gently lower one truffle ball into the melted chocolate. Spoon chocolate over the top to fully coat it. Lift the truffle out of the chocolate using the fork, and gently tap the fork on the edge of the bowl to let the excess chocolate drip off.
- Set and Decorate : Carefully slide the coated truffle off the fork and onto the parchment-lined baking sheet. While the chocolate is still wet, press two mini chocolate chips into the top for ears and two for eyes. You can also add a tiny dot of melted chocolate for a nose. Repeat with the remaining truffles.
- Let Them Set : Place the baking sheet in the refrigerator for about 15-20 minutes, or until the chocolate is completely firm and set. Do not skip this step, or the truffles will be a gooey mess when you try to pick them up.
Cooking Tips & Techniques
I have made these truffles more times than I can count, and I have definitely learned a few things the hard way. Here are my best tips for truffle success.
- Room Temperature Is Your Friend : This is the most important tip. Cold cream cheese will give you lumpy truffles. Cold truffle mixture will crack when you try to dip it. Let your cream cheese sit out for at least 30 minutes before you start. And if the truffle balls feel too cold right out of the fridge, let them sit on the counter for 5 minutes before dipping.
- Don’t Overmix : When you are combining the Oreo crumbs with the cream cheese, mix just until it comes together. Overmixing can make the mixture too dense and almost greasy. You want it to be cohesive but still light.
- The Fork Tap Trick : When you lift a truffle out of the melted chocolate, tap the fork handle gently on the edge of the bowl. This helps the excess chocolate drip off and gives you a smoother, more even coating. It also prevents a big puddle of chocolate from forming at the bottom of the truffle.
- Work in Small Batches : If you are making a double batch, do not melt all the chocolate at once. Melt it in smaller batches as you go. Chocolate that sits too long can thicken up and become difficult to work with. If your chocolate starts to thicken, add a teaspoon of coconut oil or vegetable shortening to thin it out.
- Dealing with Sticky Hands : If the truffle mixture is sticking to your hands while you roll, lightly dampen your palms with a little bit of cold water. It helps the mixture slide right off your skin without adding too much moisture.
Variations & Adaptations
One of the best things about this recipe is how easy it is to customize. I have tried a bunch of different versions, and they are all delicious in their own way.
- Spooky Spider Truffles : Instead of making cat faces, dip the truffles in the black chocolate and then press in eight pretzel stick legs on each side. Use a tiny dot of white frosting to attach two candy eyes. These are perfect for a more classic Halloween look.
- White Chocolate Ghost Truffles : Skip the black food coloring entirely. Dip the truffles in white chocolate. While the chocolate is still wet, press in two mini chocolate chips for eyes and one for a mouth. They look like adorable little ghosts. This is a great option if you are feeding younger kids who might be scared of the black cats.
- Mint Oreo Version : Use Mint Oreos instead of the classic chocolate ones. The mint and chocolate combination is fantastic. For the coating, use green candy melts or white chocolate colored green. You can call them Frankenstein truffles or creepy mint bites.
- Peanut Butter Surprise : Before rolling the truffles, press a small peanut butter chip or a mini Reese’s cup into the center of each one. Encase the filling completely with the Oreo mixture. It adds a lovely salty-sweet surprise in the middle. This is my personal favorite variation. It reminds me of the no-bake s’mores icebox cake I make in the summer — all the flavor, none of the oven heat.
- Gluten-Free Option : Use gluten-free chocolate sandwich cookies. Most major brands make a gluten-free version that works perfectly in this recipe. Make sure to check the labels on your chocolate melts as well, as some can contain gluten.
Serving & Storage Suggestions
These truffles are best served cold, right out of the fridge. The chocolate stays nice and snappy, and the filling is firm and creamy. Here is how to serve and store them.
- Serving Temperature : Serve them directly from the refrigerator. They can sit out at room temperature for about 30 minutes to an hour for a party, but any longer and the chocolate might start to get a little soft. If you are serving them outside on a warm Halloween night, keep the platter on a bed of ice.
- Presentation Ideas : Arrange the truffles on a black or orange platter for a spooky look. You can also place each truffle in a mini black or orange paper cupcake liner. It makes them look extra special and keeps them from sticking together. For a fun touch, add a few plastic spiders or candy corn around the platter. They look amazing next to a batch of our spider web cheesecake bars.
- Refrigerator Storage : Store the truffles in an airtight container in the refrigerator. They will stay fresh for up to one week. Layer them between sheets of parchment paper to prevent them from sticking to each other.
- Freezer Storage : These truffles freeze beautifully. Place them in a single layer on a baking sheet and freeze for about an hour. Once they are solid, transfer them to a freezer-safe bag or container. They will keep for up to 3 months. Thaw them in the refrigerator overnight before serving.
- Flavor Development : Honestly, these truffles taste even better the next day. The flavors have time to meld together, and the texture becomes even more fudgy and smooth. So do not be afraid to make them a day or two ahead of your party.
Nutritional Information & Benefits
Let’s be honest — these are a treat, not a health food. But it is still good to know what is in them. Here is a rough estimate for one truffle (based on 24 servings).
- Calories : Approximately 180-200 calories per truffle.
- Fat : About 12 grams of fat, mostly from the cream cheese and chocolate.
- Carbohydrates : Around 18 grams of carbohydrates.
- Sugar : Approximately 14 grams of sugar.
- Protein : About 2 grams of protein.
While these are not low-calorie, they are a great option for a controlled portion size. One or two truffles is usually enough to satisfy a sweet craving. The cream cheese does add a small amount of calcium and protein. If you are looking for a slightly lighter option, you can use reduced-fat cream cheese, but the texture will be a little softer. These truffles are also naturally egg-free and nut-free (depending on your chocolate), making them a safe option for many common allergies. Just be sure to check the labels on your Oreos and chocolate if you have specific dietary concerns.
Conclusion
These Easy Black Cat Oreo Truffles are proof that Halloween treats do not have to be complicated to be incredible. They are fun to make, adorable to look at, and absolutely delicious to eat. Whether you are hosting a big costume party or just want to surprise your family with something special, these little black cats are the perfect no-fuss dessert. I love that I can make them with my kids without worrying about a hot oven, and I love that they disappear in minutes every single time. I really hope you give them a try. Play around with the decorations, make them your own, and do not forget to take a picture before they vanish. If you make them, I would love to hear how they turned out. Drop a comment below and let me know your favorite Halloween treat. Happy Halloween, and happy snacking!
Frequently Asked Questions
Can I use Double Stuf Oreos for this recipe?
You can, but the texture will be a little different. Double Stuf Oreos have more cream filling, which can make the truffle mixture softer and a bit sweeter. If you use them, you might need to add a few extra crushed Oreos to get the right consistency. I recommend sticking with regular Oreos for the best results.
Why is my melted chocolate seizing up?
Chocolate seizes when it comes into contact with even a tiny amount of water. This can happen if your bowl is not completely dry, or if you are using water-based food coloring. Always use a completely dry bowl and utensils. If you are coloring white chocolate, use an oil-based candy coloring. If your chocolate does seize, you can try stirring in a teaspoon of vegetable oil or coconut oil to smooth it out, but it is often better to just start fresh.
Can I make these truffles vegan?
Yes, with a few swaps. Use a vegan cream cheese alternative, like the one from Kite Hill or Tofutti. Use vegan chocolate sandwich cookies (Oreos are actually vegan, believe it or not). And use vegan white chocolate or dark chocolate for the coating. The texture will be slightly different, but they are still delicious.
How do I get the black coloring really dark?
Getting a true black color can be tricky. If you are using white chocolate, the key is patience. Add your oil-based black food coloring a drop at a time, stirring well after each drop. The color will deepen as it sits. You might need more drops than you think. If you want a foolproof deep black, just buy pre-colored black candy melts. They are already perfectly colored and melt like a dream.
My truffle mixture is too sticky to roll. What do I do?
Do not panic. This is a common issue. First, make sure your mixture has been chilled for at least 30 minutes. If it is still sticky after chilling, add a few more crushed Oreos to the bowl and mix them in. You can also lightly dampen your hands with cold water before rolling. The moisture helps the mixture release from your skin without making it wetter.
Pin This Recipe!

Easy Black Cat Oreo Truffles Halloween Recipe

These no-bake Oreo truffles are dipped in black chocolate and decorated to look like adorable black cats. Made with just three ingredients, they are the perfect easy Halloween treat that disappears fast at any party.
- Prep Time: 20 minutes
- Cook Time: 0 minutes
- Total Time: 1 hour 10 minutes (includes chilling and setting time)
- Yield: 24 truffles 1x
- Category: Dessert
- Cuisine: American
Ingredients
- 1 standard 14.3-ounce package Oreo cookies (regular, not Double Stuf or Thins)
- 8 ounces cream cheese, softened
- 12 ounces black candy melts or white chocolate melting wafers + oil-based black food coloring
- Black sprinkles or black sanding sugar (optional, for decoration)
- Mini chocolate chips or candy eyes (for the faces)
Instructions
- Crush the Oreos: Place the entire package of Oreos (filling and all) into a food processor. Pulse until they turn into a fine, dark crumb that looks like black sand. No big chunks allowed.
- Beat the cream cheese: In a large mixing bowl, beat the softened cream cheese with an electric mixer on medium speed until completely smooth and fluffy, about 2 minutes. Scrape down the sides of the bowl once or twice.
- Combine: Add the crushed Oreo crumbs to the bowl with the cream cheese. Mix on low speed until fully combined. The mixture should look like a thick, dark, slightly sticky dough that holds together when pressed. If too dry, add a teaspoon of milk; if too sticky, add a few more crushed Oreos.
- Chill the mixture: Cover the bowl with plastic wrap and refrigerate for at least 30 minutes (up to 1 hour). This makes it easier to roll.
- Roll the truffles: Using a small cookie scoop or your hands, roll the mixture into 1-inch balls. You should get about 24 truffles. Place them on a parchment-lined baking sheet. If the mixture gets sticky, return it to the fridge for 5 minutes.
- Melt the chocolate: Place black candy melts or white chocolate wafers in a microwave-safe bowl. Microwave in 30-second intervals, stirring well after each, until completely smooth. If using white chocolate, add oil-based black food coloring a drop at a time until desired shade is reached.
- Dip the truffles: Using a fork, gently lower one truffle ball into the melted chocolate. Spoon chocolate over the top to fully coat. Lift the truffle out and gently tap the fork on the edge of the bowl to let excess chocolate drip off.
- Set and decorate: Carefully slide the coated truffle onto the parchment-lined baking sheet. While the chocolate is still wet, press two mini chocolate chips into the top for ears and two for eyes. Optionally add a tiny dot of melted chocolate for a nose. Repeat with remaining truffles.
- Let them set: Place the baking sheet in the refrigerator for 15-20 minutes, or until the chocolate is completely firm and set.
Notes
For best results, use room temperature cream cheese. Chill the truffle mixture for at least 30 minutes before rolling. If chocolate thickens while dipping, add a teaspoon of coconut oil or vegetable shortening. These truffles taste even better the next day. Store in an airtight container in the refrigerator for up to 1 week, or freeze for up to 3 months.
Nutrition
- Serving Size: 1 truffle
- Calories: 190
- Sugar: 14
- Sodium: 120
- Fat: 12
- Saturated Fat: 6
- Carbohydrates: 18
- Fiber: 1
- Protein: 2
Keywords: Halloween truffles, Oreo truffles, black cat truffles, no-bake Halloween dessert, easy Halloween treat