My neighbor, a retired baker named Mrs. Kowalski, watched me wrestling a screaming toddler into a snowsuit one December morning. She didn’t say anything at first. Then she just handed me a tin through the fence. “For later,” she said with a wink. Inside were these soft, pillowy cookies that tasted like Christmas in a single bite—a gentle spice, a hint of something creamy, and that classic crackled sugar top. I practically inhaled two before my coffee was finished.
I asked her about the recipe, of course. She laughed and said it was just her snickerdoodle dough with a splash of “holiday magic.” It took me three batches to figure out the trick—a little eggnog in the dough and a dusting of nutmeg in the sugar coating. Honestly, I’ve never looked back. These cookies are now the first thing my kids ask for when the holiday decorations come down from the attic. They disappear faster than I can bake them, which is saying something.
Maybe you’ve been there, trying to find that one cookie that makes everyone happy without spending all day in the kitchen. These eggnog snickerdoodles are it. They come together in about 20 minutes of hands-on work, and the dough is forgiving enough that even a five-year-old can help roll the balls. I mean, my youngest once dropped a whole scoop of cinnamon on the floor, and the cookies still turned out perfect. That’s the kind of recipe you need during the holiday chaos.
What I love most is how this recipe traveled from Mrs. Kowalski’s kitchen to mine, and now to yours. It’s proof that the best recipes aren’t complicated—they’re just shared with care. Every time I bake these, I think of that snowy morning and the kindness of a neighbor who saw a tired mom and offered a moment of sweetness. That’s what keeps me coming back to this recipe year after year.
Why You’ll Love This Recipe
Let me tell you why these cookies have become a staple in our house. First off, they’re ridiculously easy to make. We’re talking about 20 minutes of prep, then 10 minutes in the oven. The dough comes together in one bowl, which means less cleanup and more time for decorating the tree or just putting your feet up. I’ve tested this recipe with a toddler “helping” and a baby on my hip, and it still works. That’s the kind of weeknight-friendly baking I can get behind.
- Kid-Approved Flavor: The eggnog adds a creamy sweetness that kids love, while the cinnamon-nutmeg coating gives it that classic snickerdoodle tang. My picky eater, who claims to “hate” anything with spice, devoured four of these in one sitting.
- Simple Ingredients: You probably have most of these in your pantry already—flour, sugar, butter, eggs. The only special item is eggnog, which is everywhere during the holidays. No weird extracts or hard-to-find spices.
- Perfect for Holiday Baking: Whether it’s a cookie swap, a school party, or just a cozy night in, these cookies fit right in. They travel well, they freeze beautifully, and they make the house smell like a winter wonderland.
- Crowd-Pleaser: I’ve brought these to three different holiday gatherings, and not a single cookie came home. Adults love the subtle eggnog flavor, and kids can’t get enough of the soft, chewy texture.
- Unbelievably Delicious: The secret is in the texture—crispy edges with a soft, almost cake-like center. The eggnog keeps the dough tender, and the sugar coating adds that satisfying crunch. It’s comfort food in cookie form.
What makes this recipe different from all the other snickerdoodles out there? It’s the eggnog, plain and simple. Most recipes just swap in some extract or skip the holiday flavor altogether. But by using real eggnog, you get a richness that you just can’t fake. The fat and flavor from the eggnog make the cookies softer and more tender, with a subtle creaminess that pairs perfectly with the warm spices. I’ve tried versions with just cinnamon, with pumpkin pie spice, even with a splash of rum extract. Nothing beats the real thing. This isn’t just another snickerdoodle—it’s your new holiday secret weapon.
What Ingredients You Will Need
This recipe uses simple, wholesome ingredients that work together to create a cookie that’s soft, chewy, and full of holiday flavor. Most of these are pantry staples you probably already have on hand, especially if you do any baking during the season. Let’s break down what you need and why each ingredient matters.
For the Cookie Dough
- All-purpose flour, 2 ¾ cups (330g) – Spoon and level your flour for the best results. Scooping directly from the bag can pack in too much flour, making your cookies dry. I use Gold Medal, but any brand works fine.
- Unsalted butter, 1 cup (226g), softened – Make sure it’s at room temperature. Cold butter won’t cream properly with the sugar, and melted butter will change the texture. Leave it on the counter for about an hour before you start.
- Granulated sugar, 1 ½ cups (300g) – Regular white sugar gives the cookies their structure and sweetness. I’ve tried reducing it to 1 cup, and the cookies were still good but not as tender.
- Eggnog, ⅓ cup (80ml) – Use the good stuff, not the low-fat version. Full-fat eggnog has more cream and less water, which means better flavor and texture. I like Hood or the store brand at my local grocery store.
- Large egg, 1 – Room temperature, please. It mixes more evenly into the butter-sugar mixture. If you forgot to take it out, place it in a bowl of warm water for 5 minutes.
- Vanilla extract, 1 teaspoon – Pure vanilla is best, but imitation works in a pinch. It adds warmth and depth to the holiday flavors.
- Cream of tartar, 2 teaspoons – This is what gives snickerdoodles their signature tangy flavor and soft texture. Don’t skip it. If you don’t have cream of tartar, you can substitute 1 teaspoon of lemon juice, but the texture won’t be quite as soft.
- Baking soda, 1 teaspoon – Helps the cookies spread and rise just a little. Make sure it’s fresh—check the expiration date on the box.
- Salt, ½ teaspoon – Balances the sweetness and brings out the flavors. I use fine sea salt.
- Ground cinnamon, 1 teaspoon – Adds warmth and that classic snickerdoodle flavor. I prefer Saigon cinnamon for its stronger, sweeter taste.
- Ground nutmeg, ½ teaspoon – This is where the eggnog flavor really shines. Freshly grated nutmeg is amazing if you have it, but pre-ground works just fine.
For the Coating
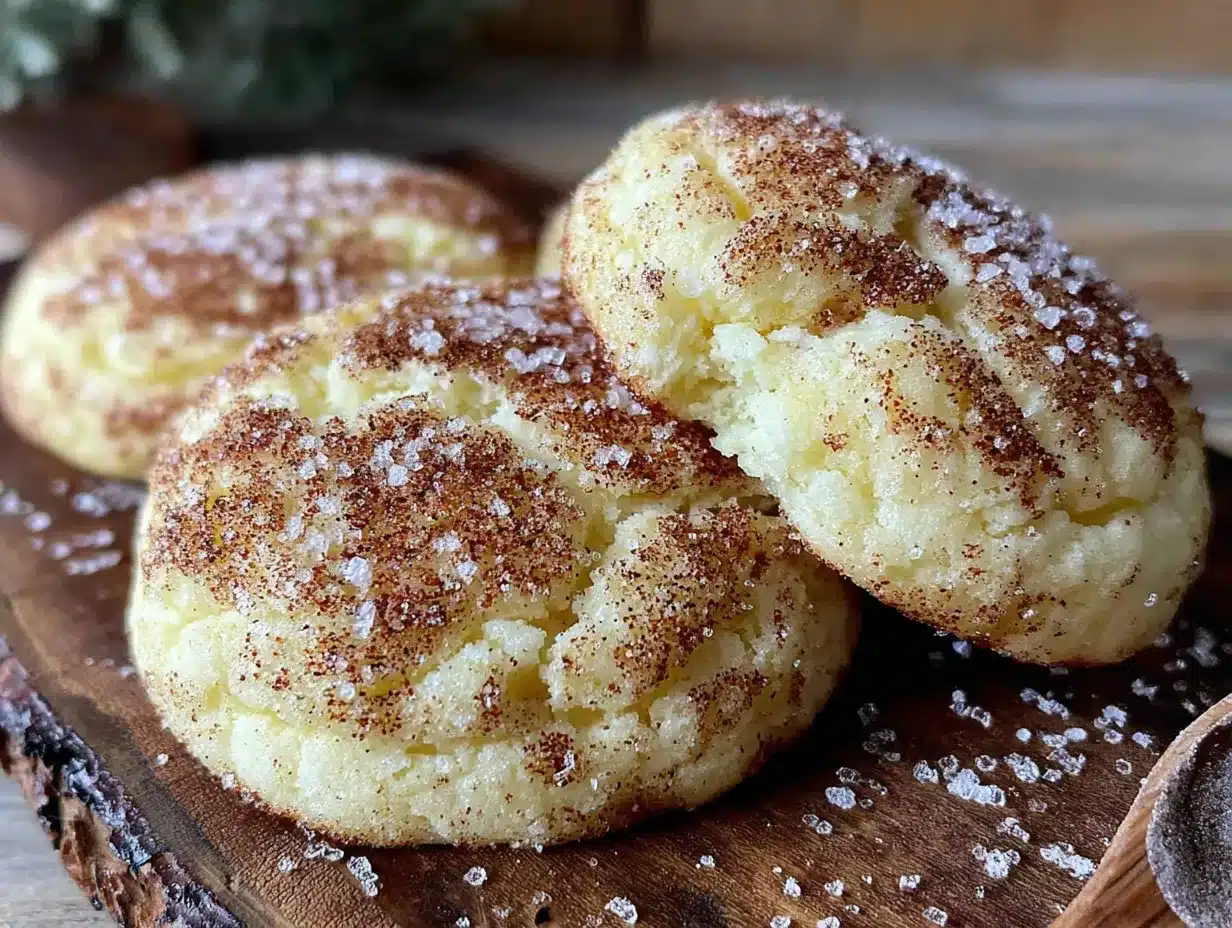
- Granulated sugar, ¼ cup (50g) – For rolling the dough balls before baking. The sugar creates that beautiful crackled top.
- Ground cinnamon, 1 tablespoon – Mixed with the sugar for the coating. Don’t skimp here—this is where the cookie gets its first impression of flavor.
- Ground nutmeg, ½ teaspoon – Adds an extra layer of eggnog essence on the outside. It’s subtle but makes a difference.
Substitution Notes
If you’re out of eggnog, you can use ⅓ cup of whole milk mixed with 1 tablespoon of melted butter and a pinch of nutmeg. It’s not quite the same, but it works in a pinch. For a dairy-free version, use a plant-based butter like Earth Balance and a vegan eggnog. The texture will be slightly different, but the flavor is still delicious. And if you don’t have cream of tartar, you can skip it, but the cookies will be flatter and less tangy. I’ve done it before, and my kids still ate them, but they weren’t as good.
Equipment Needed
You don’t need fancy equipment for these cookies, which is part of why I love them. Here’s what you’ll need:
- Large mixing bowl – Any bowl works, but I prefer a wide, shallow one for easier mixing. My favorite is a ceramic bowl from a local pottery shop that I’ve had for years.
- Electric hand mixer or stand mixer – You can cream the butter and sugar by hand, but it takes some elbow grease. A hand mixer does the job in about 2 minutes. I use a KitchenAid hand mixer that’s older than my marriage.
- Measuring cups and spoons – For accuracy, especially with the flour and spices. I have a set of metal ones that I’ve had since college.
- Baking sheets – Two standard 13×18-inch sheets work well. If you only have one, let it cool completely between batches, or the dough will spread too much.
- Parchment paper or silicone baking mat – Parchment paper makes cleanup a breeze and prevents sticking. Silicone mats work too, but the cookies might spread slightly more.
- Wire cooling rack – Essential for cooling the cookies evenly. If you don’t have one, you can use a clean dish towel, but the bottoms might get a little soggy.
- Small bowl for coating – A shallow bowl or plate works for mixing the cinnamon sugar and rolling the dough balls.
- Cookie scoop (optional) – I use a 1.5-tablespoon scoop for uniform cookies. It’s not necessary, but it makes the process faster and more consistent.
If you don’t have a cookie scoop, just use a spoon to portion the dough. The cookies will still turn out great—they might just vary a little in size. That’s okay, honestly. Homemade cookies aren’t supposed to be perfect.
Preparation Method
Let’s get baking. This recipe is straightforward, but I’ve included some tips I learned from my early failures. Trust me, I’ve made every mistake in the book so you don’t have to.
- Preheat your oven to 350°F (175°C). Line two baking sheets with parchment paper. This gives the oven time to come to temperature while you mix the dough. I forgot to preheat once and ended up with flat cookies—don’t be like me.
- In a large mixing bowl, cream together the softened butter and 1 ½ cups of granulated sugar. Beat on medium speed for about 2-3 minutes, until the mixture is light and fluffy. Scrape down the sides of the bowl halfway through. You’re looking for a pale yellow color and a texture that’s almost like whipped cream. If you’re using a hand mixer, this might take a little longer. If you’re doing it by hand, get ready for a mini arm workout.
- Add the eggnog, egg, and vanilla extract. Beat on low speed until just combined. Don’t overmix here, or the dough might get tough. You’ll see the mixture look a little curdled at this point—that’s totally normal. The eggnog and egg don’t always emulsify perfectly, but it comes together in the next step.
- In a separate bowl, whisk together the flour, cream of tartar, baking soda, salt, cinnamon, and nutmeg. Whisking ensures the leavening agents and spices are evenly distributed. I used to skip this step and just dump everything into the wet ingredients, but I ended up with pockets of baking soda in some cookies. Not fun.
- Gradually add the dry ingredients to the wet ingredients, mixing on low speed. Add about a third of the flour mixture at a time, mixing until just combined after each addition. The dough will be soft and slightly sticky, but it shouldn’t be wet. If it’s too sticky to handle, add another tablespoon of flour. If it’s too dry, add a splash of eggnog.
- In a small bowl, mix together the coating ingredients: ¼ cup sugar, 1 tablespoon cinnamon, and ½ teaspoon nutmeg. Use a fork to combine them evenly. The nutmeg might clump a little, so break it up with your fingers.
- Using a cookie scoop or your hands, portion the dough into 1.5-tablespoon balls. I like to roll them between my palms to make them round and smooth. If the dough is too sticky to roll, chill it in the fridge for 15 minutes. This helps the cookies hold their shape better in the oven.
- Roll each dough ball in the cinnamon-sugar mixture, coating it completely. I like to press the dough ball gently into the coating, then roll it around to cover all sides. Place the coated balls on the prepared baking sheets, spacing them about 2 inches apart. They will spread, but not too much.
- Bake for 9-11 minutes, or until the edges are set and the centers look slightly underdone. The cookies will continue to bake on the hot sheet after you take them out. I usually pull them at the 10-minute mark, when the edges are just starting to turn golden. The centers should look puffy and soft—don’t wait for them to look fully baked, or you’ll end up with crunchy cookies.
- Let the cookies cool on the baking sheet for 5 minutes. This is crucial. If you try to move them right away, they’ll fall apart. After 5 minutes, transfer them to a wire cooling rack to cool completely. The tops will crackle beautifully as they cool, revealing that perfect snickerdoodle texture.
And that’s it. You’ve just made a batch of the best eggnog snickerdoodles you’ll ever taste. The whole process takes about 30 minutes from start to finish, including baking time. Not bad for a cookie that tastes like you spent all day in the kitchen.
Cooking Tips & Techniques
I’ve made these cookies more times than I can count, and I’ve picked up a few tricks along the way. Here are the things I wish someone had told me the first time I tried this recipe.
Don’t overbake. This is the number one mistake I see. Snickerdoodles are supposed to be soft and chewy, not crispy. Pull them out of the oven when the edges are set but the centers still look a little wet. They’ll firm up as they cool. If you wait until the centers look done, they’ll be overbaked and dry. Trust me on this—I’ve thrown away more than one batch that looked “perfect” but tasted like cardboard.
Use room temperature ingredients. Cold butter won’t cream properly, and cold eggnog can cause the dough to seize up. Take everything out of the fridge about an hour before you start. If you’re in a hurry, you can microwave the butter for 10-15 seconds, but be careful not to melt it. You want it soft, not liquid.
Chill the dough if needed. If your kitchen is warm or the dough feels too sticky, pop it in the fridge for 15-20 minutes before rolling. This prevents the cookies from spreading too much in the oven. I learned this the hard way when I made a batch on a hot summer day and ended up with flat, pancake-like cookies. Chilling the dough made all the difference.
Roll the dough balls evenly. Uniform size means uniform baking. If some cookies are bigger than others, the small ones will burn while the big ones are still raw. I use a cookie scoop for consistency, but you can also weigh the dough balls if you’re feeling precise. Aim for about 30 grams each.
Double the coating. I like to roll each dough ball in the cinnamon-sugar mixture twice—once to coat it, then again after a quick reshape. This gives the cookies a thicker, more flavorful crust. It’s a small extra step that makes a big difference.
Use fresh spices. Cinnamon and nutmeg lose their potency over time. If your spices are more than a year old, consider buying fresh ones for the holidays. The flavor is much more vibrant, and it really shines in these cookies. I keep a small jar of freshly grated nutmeg in my pantry just for this recipe.
Variations & Adaptations
One of the best things about this recipe is how easy it is to customize. Here are some variations I’ve tried and loved:
Eggnog Cream Cheese Snickerdoodles: Add 4 ounces of softened cream cheese to the butter and sugar mixture. This makes the cookies even softer and gives them a subtle tang that pairs beautifully with the eggnog. You might need to add an extra tablespoon of flour to compensate for the extra moisture. My sister-in-law tried this version and now refuses to make them any other way.
Gluten-Free Version: Substitute the all-purpose flour with a 1:1 gluten-free baking flour blend. I’ve used Bob’s Red Mill and King Arthur brands with good results. The texture will be slightly more crumbly, but the flavor is still fantastic. Just make sure your blend contains xanthan gum, or the cookies might fall apart.
Vegan Eggnog Snickerdoodles: Use a plant-based butter like Earth Balance, a flax egg (1 tablespoon ground flaxseed mixed with 3 tablespoons water), and vegan eggnog. The cookies will be a little less tender, but they’re still delicious. I made these for a friend who’s vegan, and she said they were the best cookies she’d had in years.
Spiced Up Version: Add ½ teaspoon of ground ginger and ¼ teaspoon of ground cloves to the dry ingredients. This gives the cookies a more complex, chai-like flavor. I tried this one Christmas when I ran out of nutmeg, and it was a happy accident. The ginger adds a little warmth that’s perfect for cold winter nights.
Chocolate-Dipped Version: Once the cookies are completely cool, dip half of each cookie in melted dark chocolate and let it set on parchment paper. The combination of spicy, sweet cookie and rich chocolate is incredible. This is my go-to for holiday cookie platters because it looks fancy but takes almost no extra effort.
Serving & Storage Suggestions
These cookies are best served warm, straight from the oven, with a tall glass of cold milk or a cup of hot coffee. The soft, pillowy texture and crackly sugar top are at their peak within the first hour. But let’s be real—they’re still amazing the next day, if they last that long.
For a holiday dessert table, arrange them on a festive platter with a sprinkle of extra nutmeg on top. They look beautiful next to gingerbread cookies and peppermint bark. I also like to package them in clear cellophane bags tied with red ribbon for homemade gifts. Everyone loves getting cookies, and these are especially welcome during the holiday season.
Storage: Store the cookies in an airtight container at room temperature for up to 5 days. Place a slice of bread in the container to keep them soft—the cookies will absorb the moisture from the bread. I learned this trick from my grandmother, and it works like a charm. Just replace the bread slice every couple of days.
Freezing: These cookies freeze beautifully. You can freeze the baked cookies for up to 3 months. Place them in a single layer on a baking sheet, freeze until solid, then transfer to a freezer-safe bag or container. To thaw, leave them at room temperature for about 30 minutes. You can also freeze the unbaked dough balls—just roll them in the coating, place them on a baking sheet, freeze until solid, then transfer to a bag. Bake from frozen, adding 1-2 minutes to the baking time. This is my secret for having fresh cookies ready in minutes when unexpected guests show up.
Reheating: If you want that just-baked experience, pop a cookie in the microwave for 10 seconds. It’s not quite the same as fresh from the oven, but it’s close. For a larger batch, reheat them in a 300°F oven for 3-5 minutes.
Nutritional Information & Benefits
Let’s be honest—these are cookies, not health food. But that doesn’t mean they can’t fit into a balanced diet, especially during the holidays when a little indulgence is part of the fun. Here’s a rough estimate of the nutritional content per cookie (based on a batch of 36 cookies):
| Nutrient | Amount per Cookie |
|---|---|
| Calories | 135 |
| Total Fat | 6g |
| Saturated Fat | 3.5g |
| Cholesterol | 20mg |
| Sodium | 85mg |
| Total Carbohydrates | 19g |
| Sugars | 12g |
| Protein | 2g |
Now, for the silver lining. Eggnog is made with milk and eggs, so it provides a small amount of calcium and protein. Cinnamon has been shown to help regulate blood sugar levels, and nutmeg contains antioxidants. I’m not saying these cookies are a health food, but they’re not empty calories either. They’re made with real ingredients, and when you eat them as part of a balanced diet, they’re just a joyful part of the holiday season.
If you’re watching your sugar intake, you can reduce the sugar in the dough to 1 cup and use a sugar substitute like Swerve for the coating. The texture will be slightly different, but the flavor is still good. I’ve also made them with coconut sugar, which gives them a deeper, caramel-like flavor. Just keep in mind that these changes will affect the nutritional values.
Conclusion
These eggnog snickerdoodle cookies have become a non-negotiable part of my holiday baking rotation. They’re simple enough to make with kids, fancy enough to bring to a party, and delicious enough to disappear in minutes. Every time I bake them, I think of Mrs. Kowalski and that snowy morning, and I’m reminded that the best recipes come from the people who share them with love.
I hope you give these cookies a try. Don’t be afraid to make them your own—add a little extra nutmeg if you love that flavor, or try the chocolate-dipped version for something special. The beauty of this recipe is that it’s forgiving and adaptable, just like the best family traditions.
When you make them, I’d love to hear how they turn out. Leave a comment below and let me know if your kids loved them as much as mine do. Did you try any variations? Did you double the batch? I read every comment, and your stories inspire me to keep baking and sharing. Until next time, happy baking, and may your kitchen always smell like cinnamon and nutmeg.
Frequently Asked Questions
Can I use low-fat eggnog in this recipe?
You can, but the cookies won’t be as tender or flavorful. Low-fat eggnog has more water and less cream, which can make the cookies slightly denser. I recommend using full-fat eggnog for the best results. If that’s all you have, add an extra tablespoon of butter to compensate for the missing fat.
Why did my cookies turn out flat?
Flat cookies usually mean one of three things: your butter was too warm, your dough wasn’t chilled, or your baking soda is old. Make sure your butter is softened but not melted, chill the dough for 15 minutes if your kitchen is warm, and check that your baking soda is fresh (it should fizz when mixed with vinegar).
Can I make the dough ahead of time?
Absolutely. You can refrigerate the dough for up to 3 days or freeze it for up to 3 months. If refrigerating, let the dough sit at room temperature for 10 minutes before rolling, as it will be quite firm. If freezing, roll the dough into balls and coat them in the cinnamon sugar before freezing, then bake from frozen, adding a couple of minutes to the baking time.
How do I get the perfect crackly top?
The crackly top comes from the sugar coating and the cream of tartar. Make sure you roll the dough balls generously in the cinnamon-sugar mixture, and don’t overbake the cookies. Pull them out when the edges are set but the centers still look slightly underdone. The cracks will form as they cool on the baking sheet.
Can I use eggnog extract instead of real eggnog?
You can, but I don’t recommend it. Eggnog extract is artificial and doesn’t provide the same richness or moisture that real eggnog does. If you don’t have eggnog, a better substitute is whole milk mixed with a little melted butter and a pinch of nutmeg. The texture will be closer to the original recipe.
Pin This Recipe!

Kid-Approved Eggnog Snickerdoodle Cookies: Easy Holiday Recipe

Soft, pillowy snickerdoodle cookies with a hint of eggnog and a crackled cinnamon-nutmeg sugar top. An easy, kid-approved holiday recipe that comes together in about 30 minutes.
- Prep Time: 20 minutes
- Cook Time: 10 minutes
- Total Time: 30 minutes
- Yield: 36 cookies 1x
- Category: Dessert
- Cuisine: American
Ingredients
- 2 ¾ cups (330g) all-purpose flour
- 1 cup (226g) unsalted butter, softened
- 1 ½ cups (300g) granulated sugar
- ⅓ cup (80ml) eggnog (full-fat recommended)
- 1 large egg, room temperature
- 1 teaspoon vanilla extract
- 2 teaspoons cream of tartar
- 1 teaspoon baking soda
- ½ teaspoon salt
- 1 teaspoon ground cinnamon
- ½ teaspoon ground nutmeg
- ¼ cup (50g) granulated sugar (for coating)
- 1 tablespoon ground cinnamon (for coating)
- ½ teaspoon ground nutmeg (for coating)
Instructions
- Preheat oven to 350°F (175°C). Line two baking sheets with parchment paper.
- In a large bowl, cream together softened butter and 1½ cups granulated sugar on medium speed for 2-3 minutes until light and fluffy.
- Add eggnog, egg, and vanilla extract; beat on low until just combined (mixture may look curdled).
- In a separate bowl, whisk together flour, cream of tartar, baking soda, salt, cinnamon, and nutmeg.
- Gradually add dry ingredients to wet ingredients, mixing on low until just combined. Dough should be soft and slightly sticky.
- In a small bowl, mix coating ingredients: ¼ cup sugar, 1 tablespoon cinnamon, and ½ teaspoon nutmeg.
- Portion dough into 1.5-tablespoon balls (about 30g each). Roll into smooth balls.
- Roll each dough ball in the cinnamon-sugar mixture to coat completely.
- Place coated balls on prepared baking sheets, spacing 2 inches apart.
- Bake for 9-11 minutes, until edges are set and centers look slightly underdone.
- Let cookies cool on baking sheet for 5 minutes, then transfer to a wire rack to cool completely.
Notes
For best results, use full-fat eggnog and room temperature ingredients. Do not overbake; cookies should look slightly underdone in the center when removed from the oven. Dough can be chilled for 15 minutes if too sticky. Store in an airtight container at room temperature for up to 5 days. Freeze baked cookies for up to 3 months.
Nutrition
- Serving Size: 1 cookie
- Calories: 135
- Sugar: 12
- Sodium: 85
- Fat: 6
- Saturated Fat: 3.5
- Carbohydrates: 19
- Protein: 2
Keywords: eggnog snickerdoodle cookies, holiday cookies, easy cookie recipe, kid-friendly cookies, Christmas cookies


