My niece Lily asked why I couldn’t just dip the cookies in black icing instead of carefully painting each one with a brush. I started to explain why that wouldn’t work — something about control and precision and the way royal icing behaves. Then I stopped. Honestly, I had no good reason. I was just stuck in my ways.
It was a Tuesday afternoon, three days before Halloween, and I was elbow-deep in powdered sugar with a slightly cracked mixing bowl that I refuse to throw away. Lily, who is nine and has zero patience for “fancy cooking stuff,” was supposed to be my helper. Instead, she was questioning my entire method. I almost laughed it off. But something about her confidence made me pause. So I let her try it her way.
She grabbed a piping bag, filled it with black royal icing, and proceeded to dip each sugar cookie face-down into the bag like she was stamping envelopes. I winced. I held my breath. And then she lifted one up, and I’ll be honest — my jaw actually dropped. The icing was perfectly smooth, evenly coated, and somehow not a drippy mess. She had discovered a technique I’d never thought of in fifteen years of baking these cookies. The “teacher” learned more than she taught, and let me tell you, that humbling moment made these Best Black Cat Sugar Cookies with Easy Royal Icing taste even sweeter.
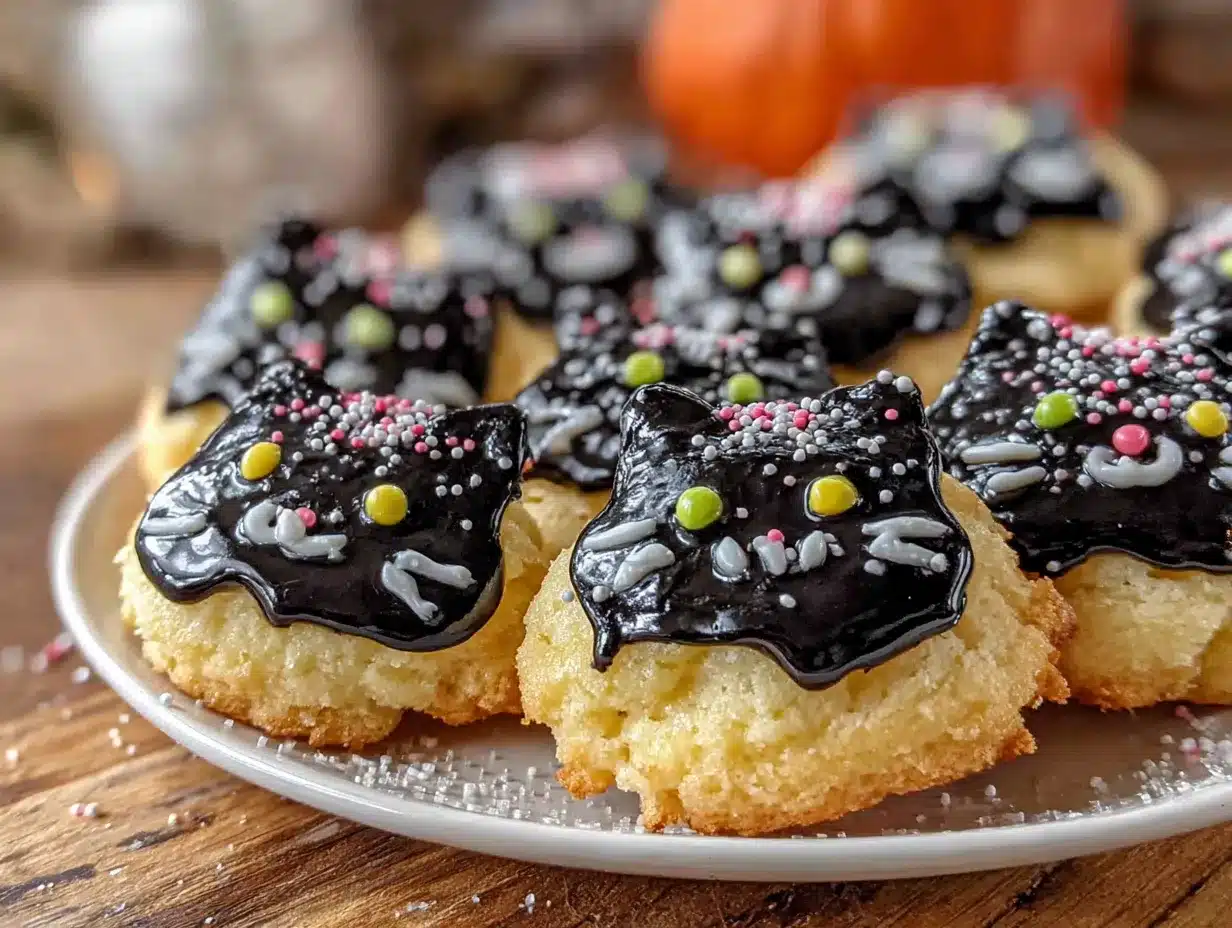
These cookies have since become my go-to for Halloween parties, potlucks, and any gathering where I want to impress without spending hours decorating each one individually. The sugar cookie base is soft but sturdy enough to hold its shape, and the royal icing sets to a glossy finish that makes these little black cats look almost too cute to eat. Almost. Because once you bite into that buttery, vanilla-kissed cookie with the delicate crunch of icing, you won’t be able to stop at one. Maybe you’ve been there — standing in your kitchen, doubting a shortcut, only to realize that sometimes the simplest method wins. That’s exactly how this recipe came to be, and I’m so glad it did.
Why You’ll Love This Recipe
These aren’t just any Halloween cookies. After years of testing and tweaking, I can confidently say this version checks every box for a crowd-pleasing treat. Here’s why you’ll keep coming back to it:
- Quick & Easy: From start to finish, you’re looking at about 45 minutes of active time. The dough comes together in one bowl, and the icing sets in under an hour. Perfect for busy weeknights or last-minute Halloween party prep.
- Simple Ingredients: No fancy extracts, no specialty flours. You probably have everything in your pantry right now — butter, sugar, eggs, vanilla, and all-purpose flour. The royal icing uses just powdered sugar, meringue powder, and water.
- Perfect for Hosting: These cookies are designed to impress a crowd. They look professional without requiring professional skills. Serve them at your Halloween gathering, and watch guests do a double-take before grabbing a second one.
- Crowd-Pleaser: Kids love the cat shape, adults appreciate the nostalgic sugar cookie flavor, and everyone fights over the ones with the most icing. I’ve brought these to three different potlucks, and they disappear every single time.
- Unbelievably Delicious: The texture is where this recipe shines. The cookie is tender with a slight crisp edge, and the royal icing adds a satisfying snap that melts on your tongue. It’s next-level comfort food disguised as a holiday decoration.
What makes this recipe different from every other black cat cookie out there? It’s the dipping method I learned from Lily. Instead of piping intricate details or flooding each cookie individually, you dip the baked cookies face-down into a shallow bowl of royal icing. The result is a flawless, smooth coating every single time. No streaks, no bubbles, no stress. This technique saves you at least twenty minutes per batch and produces consistently beautiful cookies that look like they came from a bakery.
These cookies also connect to something deeper. They remind me that cooking — and baking — isn’t about being perfect. It’s about being open to new ideas, even when they come from a nine-year-old who just wants to eat the icing straight from the bowl. Every time I make these black cat cookies, I smile thinking about that Tuesday afternoon. And honestly, that’s the kind of recipe worth sharing.
What Ingredients You Will Need
This recipe uses simple, wholesome ingredients to create a sugar cookie that holds its shape beautifully and pairs perfectly with a glossy royal icing. Most of these are pantry staples, so you likely won’t need a special trip to the store.
For the Sugar Cookies
- 1 cup (226g) unsalted butter, softened — I prefer using Plugrà or Kerrygold for the richest flavor. Make sure it’s truly softened to room temperature, not melted. Cold butter won’t cream properly with the sugar.
- 1 cup (200g) granulated sugar — Regular white sugar works best here. Brown sugar would add too much moisture and cause the cookies to spread.
- 1 large egg, room temperature — Cold egg can seize the butter mixture. Let it sit on the counter for 30 minutes before starting.
- 1 teaspoon vanilla extract — Pure vanilla extract makes a noticeable difference. Avoid imitation vanilla if you can.
- 2 ½ cups (312g) all-purpose flour — Spoon and level your flour for accuracy. Scooping directly from the bag packs in too much flour and makes dry cookies.
- ½ teaspoon baking powder — This gives the cookies a slight lift without making them puffy.
- ½ teaspoon salt — Fine sea salt or table salt. It balances the sweetness.
For the Royal Icing
- 2 cups (240g) powdered sugar, sifted — Sifting removes lumps and ensures a silky smooth icing. Trust me on this one.
- 2 tablespoons meringue powder — This stabilizes the icing and helps it dry with a hard, glossy finish. I recommend Wilton brand for consistent results.
- 3-4 tablespoons water — Start with 3 tablespoons and add the fourth only if needed. The consistency should be thick but flow slowly from a spoon.
- Black gel food coloring — Liquid food coloring will thin the icing too much. Gel coloring gives you a deep, true black without changing the texture. I use Americolor Super Black.
For Decoration
- Cat-shaped cookie cutter — Any size works, but medium-sized cutters (about 3 inches) are easiest to dip and decorate.
- White or yellow gel food coloring (optional) — For adding eyes to the cats. A tiny dot makes all the difference.
Substitution Guidance: If you don’t have meringue powder, you can use 2 large egg whites instead. The icing will still set, but it won’t be quite as stable and needs to be used within 24 hours. For a dairy-free version, swap the butter with a high-quality vegan butter stick (not margarine). The texture will be slightly less tender but still delicious.
Equipment Needed
You don’t need a professional bakery setup for these cookies. Here’s what you’ll need:
- Electric stand mixer or hand mixer — Creaming butter and sugar by hand is possible but takes serious arm strength. A mixer makes it effortless.
- Large mixing bowl — Glass or stainless steel works best. Avoid plastic bowls that can retain grease.
- Rolling pin — A standard wooden rolling pin is fine. If you have adjustable rings, they help maintain even thickness.
- Cat-shaped cookie cutter — I found mine at a local baking supply store for $4. Amazon has plenty of options too.
- Baking sheets — Two large sheets work well for batch baking. Line them with parchment paper or silicone baking mats.
- Parchment paper or silicone baking mats — Silicone mats are reusable and prevent sticking without extra grease.
- Cooling rack — Essential for letting cookies cool completely before icing. I use a simple wire rack from the grocery store.
- Shallow bowl or plate — For the dipping method. A bowl slightly wider than your cookie cutter works perfectly.
- Piping bag or zip-top bag — For adding eyes or details. A small zip-top bag with the corner snipped off works great in a pinch.
Budget-Friendly Tip: If you don’t own a cat cookie cutter, you can freehand cut the shape with a knife. Just roll the dough, place a small paper template on top, and cut around it. It takes a little longer but works perfectly.
Preparation Method
Let’s get baking. This method is broken down into clear steps so you can follow along without any guesswork. I’ve included sensory cues and time estimates to help you know exactly what to look for at each stage.
Step 1: Make the Cookie Dough (10 minutes)
In your stand mixer fitted with the paddle attachment, cream together the softened butter and granulated sugar on medium speed until light and fluffy. This takes about 3 minutes. You’re looking for a pale yellow color and a texture that feels soft when you pinch it. Scrape down the sides of the bowl halfway through.
Add the egg and vanilla extract, then beat on medium until fully combined. The mixture might look slightly curdled at this point — that’s totally normal. Don’t panic.
In a separate bowl, whisk together the flour, baking powder, and salt. With the mixer on low speed, gradually add the dry ingredients to the wet mixture. Mix just until the dough comes together. You should see no streaks of flour, but don’t overmix. Overworking the dough develops gluten and makes tough cookies.
Step 2: Chill the Dough (30 minutes minimum)
Turn the dough out onto a lightly floured surface. Divide it into two equal discs, wrap each tightly in plastic wrap, and refrigerate for at least 30 minutes. Chilling is non-negotiable here. It firms up the butter, prevents spreading, and makes the dough much easier to roll. If you skip this step, your cats will come out looking more like blobs.
Personal Tip: I once forgot to chill the dough because I was rushing before a party. The cookies spread into oval-shaped blobs that looked nothing like cats. Learn from my mistake — don’t skip the chill.
Step 3: Roll and Cut (15 minutes)
Preheat your oven to 350°F (175°C). Line two baking sheets with parchment paper.
Lightly flour your work surface and rolling pin. Roll one disc of dough to about ¼-inch thickness. If the dough starts sticking, dust with a little more flour. Use your cat cookie cutter to cut out shapes, pressing firmly and wiggling slightly to release. Transfer the cut cookies to the prepared baking sheets, spacing them about 1 inch apart.
Gather the scraps, re-roll, and cut again. You should get about 24 cookies from the full batch, depending on your cutter size.
Step 4: Bake (8-10 minutes)
Bake the cookies in the preheated oven for 8 to 10 minutes. You want the edges to be just barely golden — the centers should still look pale. The cookies will continue to firm up as they cool on the baking sheet. Overbaking makes them dry and crumbly.
Let the cookies rest on the baking sheet for 5 minutes, then transfer them to a wire rack to cool completely. Do not ice warm cookies. The royal icing will melt and slide right off.
Step 5: Prepare the Royal Icing (5 minutes)
In a medium bowl, whisk together the sifted powdered sugar and meringue powder. Add 3 tablespoons of water and whisk vigorously until smooth. The icing should be thick but flow slowly — think honey consistency. If it’s too thick, add the fourth tablespoon of water one drop at a time.
Add black gel food coloring. Start with a small amount — about ¼ teaspoon — and stir well. Add more until you reach your desired shade of black. Remember that the color deepens slightly as the icing dries.
Step 6: Dip the Cookies (10 minutes)
Pour the black royal icing into a shallow bowl or plate. Take a completely cooled cookie and gently press it face-down into the icing. Lift it straight up, hold it over the bowl for a few seconds to let excess drip off, then flip it right-side up and place it on the wire rack. Repeat with all cookies.
The icing will self-level and smooth out within a minute. If you see any bubbles, pop them gently with a toothpick.
Step 7: Add Eyes (Optional, 5 minutes)
While the icing is still wet, you can add eyes. Take a small amount of white or yellow royal icing (thinned to the same consistency) and pipe tiny dots onto each cat face. Use a toothpick to adjust placement if needed. Let the cookies sit at room temperature until the icing is completely set — about 1 hour.
Cooking Tips & Techniques
After making these cookies more times than I can count, I’ve collected a few tricks that make the process smoother and the results more consistent. Here are my best tips:
Use a kitchen scale for accuracy. Measuring flour by volume can be inconsistent. A cup of flour can weigh anywhere from 120 to 150 grams depending on how you scoop it. For the best results, weigh your ingredients. It takes an extra 30 seconds and saves you from dry or sticky dough.
Don’t overwork the dough. When you’re mixing in the flour, stop as soon as it comes together. If you keep mixing, the gluten develops and your cookies will be tough instead of tender. I learned this the hard way after making a batch that could have doubled as hockey pucks.
Keep the dough cold. If your kitchen is warm, the dough can get sticky fast. If you notice it becoming difficult to handle, pop it back in the fridge for 10 minutes. You can also roll the dough between two sheets of parchment paper to avoid adding excess flour.
Test your icing consistency. Before dipping all your cookies, test one. Dip a cookie and check if the icing spreads evenly. If it’s too thick, add water a drop at a time. If it’s too thin and runs off the cookie, add a little more powdered sugar. Getting the consistency right is the key to that smooth, professional finish.
Work in batches. Don’t try to dip all 24 cookies at once. The icing will start to set in the bowl, and the later cookies won’t look as smooth. Dip 6 to 8 cookies at a time, then refresh the icing in the bowl if it starts thickening.
Plan your timing for hosting. These cookies can be made entirely ahead of time. Bake them up to 3 days in advance and store them in an airtight container. Ice them the day before your gathering. The royal icing needs about an hour to set, but it stays glossy and beautiful for days.
Variations & Adaptations
One of the best things about this recipe is how easily it adapts to different tastes, dietary needs, and occasions. Here are a few variations I’ve tried and loved:
Dietary Variations
Gluten-Free: Substitute the all-purpose flour with a 1:1 gluten-free baking flour blend. I’ve used Bob’s Red Mill with great success. The cookies will be slightly more delicate, so handle them gently when transferring to the baking sheet.
Vegan: Use vegan butter sticks (not tub margarine) and replace the egg with a flax egg (1 tablespoon ground flaxseed mixed with 3 tablespoons water, let sit for 5 minutes). For the royal icing, use 2 tablespoons aquafaba (chickpea liquid) instead of meringue powder and water. The icing will still set, though it takes a bit longer.
Flavor Variations
Chocolate Black Cats: Replace ¼ cup of the flour with unsweetened cocoa powder. The cookies will be darker and have a rich chocolate flavor. You can use a lighter shade of black icing or skip the coloring altogether for a chocolate-on-chocolate look.
Lemon or Orange: Add 1 teaspoon of lemon or orange zest to the dough along with the vanilla. The citrus brightens the flavor and pairs beautifully with the sweet royal icing. This is my personal favorite for spring gatherings.
Seasonal Adaptations
While these are perfect for Halloween, the same recipe works for any occasion. Use a pumpkin cutter for fall, a ghost cutter for spooky season, or a bat cutter for a more dramatic look. The dipping method works with any shape.
Serving & Storage Suggestions
These cookies are designed to be the star of your dessert table. Here’s how to serve and store them for maximum impact.
Serving Temperature: Serve these cookies at room temperature. The royal icing is firm and glossy, and the cookie is tender. If you’ve refrigerated them, let them sit out for 15 minutes before serving. Cold cookies can taste slightly less flavorful.
Presentation Tips for Hosting: Arrange the cookies on a large platter or cake stand. For Halloween, I like to place them on a black or orange platter with a few candy corn scattered around. If you’re bringing them to a potluck, stack them in a clear container so the black cat shapes are visible. Trust me, people will notice.
What to Serve Alongside: These cookies pair beautifully with warm apple cider, hot chocolate, or a spiced chai latte. For a more decadent spread, serve them alongside a pumpkin cheesecake or caramel apple bars. The sweetness of the cookies balances well with tart or spiced flavors.
Storage: Store the cookies in an airtight container at room temperature for up to 5 days. Layer them between sheets of parchment paper to prevent the icing from sticking. Do not refrigerate — the moisture in the fridge can make the icing sticky and cause the cookies to soften.
Freezing: You can freeze the baked, un-iced cookies for up to 3 months. Wrap them tightly in plastic wrap and place them in a freezer-safe bag. When you’re ready to serve, thaw them at room temperature, then prepare the royal icing and dip. The cookies taste just as fresh.
Flavor Development: These cookies actually taste better the next day. The flavors meld together, and the texture softens slightly. If you’re planning ahead, bake and ice them a day before your event for the best results.
Nutritional Information & Benefits
While these are definitely a treat, here’s a rough breakdown of what you’re looking at per cookie (based on 24 cookies):
- Calories: 145
- Total Fat: 8g
- Saturated Fat: 5g
- Carbohydrates: 18g
- Sugar: 12g
- Protein: 1.5g
- Sodium: 55mg
Health Benefits of Key Ingredients: Butter provides vitamin A and healthy fats (in moderation). Eggs offer high-quality protein and choline, which supports brain health. While these aren’t health food, using real ingredients means you’re avoiding the preservatives and artificial additives found in store-bought cookies.
Dietary Considerations: This recipe contains dairy, eggs, and gluten. For allergen-friendly options, see the Variations section above. The cookies are nut-free as written, making them safe for school events where nut allergies are a concern.
My Perspective: I believe in balance. These cookies are a celebration treat, not an everyday snack. Enjoy them at your Halloween party, share them with friends, and don’t stress about the sugar content. Food is about joy and connection, and these little black cats deliver both.
Conclusion
These Best Black Cat Sugar Cookies with Easy Royal Icing have become a staple in my Halloween hosting rotation for one simple reason: they work. The cookies are tender and buttery, the icing is glossy and smooth, and the dipping method makes decorating almost effortless. Every time I bring them to a gathering, someone asks for the recipe. And every time, I smile and tell them the story about my niece Lily.
What I love most about this recipe is how it proves that sometimes the best ideas come from the most unexpected places. I spent years perfecting my royal icing technique, only to have a nine-year-old show me a better way. It’s a good reminder that cooking — and life — is always better when we stay open to learning.
I’d love to hear how these turn out for you. Did you try the dipping method? Did you add eyes or keep them simple? Leave a comment below and share your creations. And if you’re looking for more Halloween treats, check out my spooky pumpkin bars or ghost meringue cookies. Happy baking, and may your cookies always be perfectly dipped!
Frequently Asked Questions
Can I use a different cookie cutter shape?
Absolutely. This recipe works with any shape. The dipping method is especially forgiving for simple shapes like circles, pumpkins, or bats. Just make sure your cutter isn’t too detailed, as the icing might pool in small crevices.
Why did my cookies spread in the oven?
This usually happens when the dough wasn’t chilled long enough. Make sure you chill the discs for at least 30 minutes before rolling. Also, check that your butter was softened but not melted. If your kitchen is warm, pop the cut cookies in the fridge for 10 minutes before baking.
Can I make the royal icing ahead of time?
You can, but it’s best to use it within 24 hours. Store it in an airtight container at room temperature. Before using, whisk it well to restore the consistency. If it’s too thick, add a drop of water at a time.
How do I get the icing perfectly black?
Use gel food coloring, not liquid. Start with ¼ teaspoon and add more until you reach the desired shade. The color will deepen slightly as the icing dries. If you want an extra-dark black, let the icing sit for 10 minutes after mixing — the color will develop further.
Can I freeze the iced cookies?
I don’t recommend freezing iced cookies. The royal icing can become sticky or crack when thawed. Instead, freeze the baked, un-iced cookies and add the icing after thawing. They’ll taste just as fresh.
Pin This Recipe!

Best Black Cat Sugar Cookies with Easy Royal Icing

These soft, buttery sugar cookies are dipped in glossy black royal icing for a flawless finish every time. A quick and easy Halloween treat that looks professional without requiring special decorating skills.
- Prep Time: 45 minutes
- Cook Time: 10 minutes
- Total Time: 1 hour 55 minutes
- Yield: 24 servings 1x
- Category: Dessert
- Cuisine: American
Ingredients
- 1 cup (226g) unsalted butter, softened
- 1 cup (200g) granulated sugar
- 1 large egg, room temperature
- 1 teaspoon vanilla extract
- 2 ½ cups (312g) all-purpose flour
- ½ teaspoon baking powder
- ½ teaspoon salt
- 2 cups (240g) powdered sugar, sifted
- 2 tablespoons meringue powder
- 3–4 tablespoons water
- Black gel food coloring
- Cat-shaped cookie cutter
- White or yellow gel food coloring (optional)
Instructions
- Make the Cookie Dough: In a stand mixer with paddle attachment, cream together softened butter and granulated sugar on medium speed until light and fluffy (about 3 minutes). Add egg and vanilla extract; beat until combined. In a separate bowl, whisk together flour, baking powder, and salt. Gradually add dry ingredients to wet mixture on low speed, mixing just until dough comes together.
- Chill the Dough: Divide dough into two discs, wrap in plastic wrap, and refrigerate for at least 30 minutes.
- Roll and Cut: Preheat oven to 350°F (175°C). Line baking sheets with parchment paper. On a lightly floured surface, roll dough to ¼-inch thickness. Cut with cat-shaped cookie cutter. Transfer to prepared baking sheets, spacing 1 inch apart. Re-roll scraps and repeat.
- Bake: Bake for 8-10 minutes, until edges are just barely golden. Let cookies rest on baking sheet for 5 minutes, then transfer to a wire rack to cool completely.
- Prepare Royal Icing: In a medium bowl, whisk together sifted powdered sugar and meringue powder. Add 3 tablespoons water and whisk until smooth (honey consistency). Add black gel food coloring until desired shade is reached.
- Dip the Cookies: Pour icing into a shallow bowl. Press each cooled cookie face-down into icing, lift straight up, let excess drip off, then flip and place on wire rack. Repeat with all cookies.
- Add Eyes (Optional): While icing is still wet, pipe tiny dots of white or yellow royal icing onto each cat face. Let cookies sit at room temperature until icing is completely set (about 1 hour).
Notes
Chilling the dough is essential to prevent spreading. For best results, use a kitchen scale for accurate flour measurement. The dipping method (learned from the author’s niece) saves time and produces a smooth, professional finish. Cookies can be baked up to 3 days in advance and stored in an airtight container. Ice the day before serving.
Nutrition
- Serving Size: 1 cookie
- Calories: 145
- Sugar: 12
- Sodium: 55
- Fat: 8
- Saturated Fat: 5
- Carbohydrates: 18
- Protein: 1.5
Keywords: black cat cookies, Halloween cookies, sugar cookies, royal icing, easy decorating, dipped cookies, cat-shaped cookies


