I was at the community garden last spring, trying to wrangle a rogue zucchini vine that had decided to take over the tomato patch. An older woman named Rosa, who I’d only ever exchanged nods with, watched me struggle for a good minute before she said, “You’re fighting it too hard. Just lead it where you want it to go.” She didn’t offer to help, which I appreciated. Instead, she handed me a small, crumpled piece of paper from her apron pocket. “For the nights when the kids are hungry and you have nothing left,” she said. It was a recipe for ground beef and rice, scribbled in pencil, with a grease stain on the corner.
Honestly, I almost lost that little scrap of paper twice. Once it fell behind the fridge, and another time my youngest used it as a coaster for a juice box. But I kept finding it, kept pulling it out, and finally, on a Tuesday night when the fridge looked sad and the pantry felt emptier than usual, I made it. The first time, I burned the rice a little—I got distracted by a phone call from school. But even that slightly crunchy version had the kids asking for seconds. That’s when I knew Rosa hadn’t just given me a recipe. She’d given me a secret weapon.
The beauty of this one-pan ground beef and rice skillet is that it doesn’t ask for much. It doesn’t demand a trip to a specialty store or a clean kitchen. It just shows up, uses what you have, and feeds everyone without a fuss. Maybe you’ve been there—standing in front of the open fridge at 5:30 PM, wondering how to turn a pound of ground beef and a few pantry staples into something that doesn’t feel like a compromise. This is that recipe. It’s the one that stops the hangry meltdowns and lets you sit down at the table, too. I’ve been making it for over a year now, and I still think about that moment in the garden. Rosa didn’t teach me how to cook. She just reminded me that the best meals come from the quiet exchanges between people who understand the same struggle.
Why You’ll Love This Recipe
This isn’t just another weeknight dinner. This is the kind of meal that makes you breathe a little easier. After testing this recipe about a dozen times—some with success, some with smoke alarms going off—I can tell you exactly why it works for families like ours.
- Quick & Easy: From start to finish, this dish comes together in about 30 minutes. That’s less time than it takes to argue about what’s for dinner. Everything cooks in one pan, which means less scrubbing and more sitting.
- Simple Ingredients: You probably have most of these items in your kitchen right now. Ground beef, rice, a can of tomatoes, some basic spices. No chasing down exotic ingredients or spending a fortune.
- Perfect for Busy Weeknights: This is the meal you make on a Wednesday when everyone has homework, soccer practice, and a general case of the grumpies. It’s reliable, filling, and doesn’t require any special skills.
- Crowd-Pleaser: My kids are picky, and I mean picky. One of them once rejected mac and cheese because it was “too cheesy.” But this skillet? They clean their plates every single time. Even the one who claims she doesn’t like “mixed up food.”
- Unbelievably Delicious: There’s something about the way the rice absorbs the beef juices and the tomatoes that creates this cozy, savory flavor. It’s not fancy. It’s just good. Really, really good.
What makes this version different from the other ground beef and rice recipes out there? It’s the technique. Instead of cooking the rice separately and mixing it in later, we cook it right in the pan with the beef and broth. This lets the rice soak up all that flavor, making every single grain taste like the best part of the dish. Plus, using a specific ratio of liquid to rice keeps it from turning into a mushy mess—a lesson I learned the hard way after a few soupy disasters. This is comfort food that doesn’t weigh you down, and it’s the kind of meal that makes you feel like you’ve got this whole parenting thing figured out, even if just for one night.
What Ingredients You Will Need
This recipe relies on a handful of humble ingredients that work together to create something genuinely satisfying. Each one has a job to do, and when they all come together in that skillet, magic happens. Here’s what you’ll need and why each ingredient matters.
- 1 pound ground beef (80/20 or 85/15): The fat content here is important. Leaner beef (like 93/7) can result in a drier texture. The 80/20 gives you enough fat to flavor the rice and keep everything moist without being greasy. I usually buy whatever is on sale at my local grocery store and freeze it in one-pound portions. If you use a higher fat content, just drain off the excess after browning.
- 1 tablespoon olive oil: This is just to get things started. It helps the beef brown nicely and prevents sticking. You could use vegetable oil or even butter if that’s what you have. Honestly, I’ve used bacon grease before, and it was incredible.
- 1 medium yellow onion, diced: Onion is the backbone of so many good dishes. It adds a subtle sweetness and depth that you don’t get from onion powder alone. Dice it small so it almost melts into the beef. My kids have never once complained about finding onion chunks because they just disappear.
- 2 cloves garlic, minced: Fresh garlic makes a difference here. It adds a punch of flavor that jarred garlic just can’t match. I keep a head of garlic on the counter at all times. If you’re in a pinch, use 1/2 teaspoon of garlic powder, but fresh is better.
- 1 cup long-grain white rice, uncooked: Long-grain rice is your best bet here. It stays fluffy and separate, unlike short-grain rice which can get sticky and clumpy. Basmati or jasmine work beautifully. I’ve also used brown rice, but that requires a longer cooking time and more liquid—I’ll cover that in the variations section.
- 1 can (14.5 ounces) diced tomatoes, undrained: This provides the liquid and the acidity that balances the richness of the beef. Fire-roasted diced tomatoes add a lovely smoky flavor, but regular ones work just fine. If you only have crushed tomatoes, that’s okay too, just reduce the broth slightly.
- 2 cups low-sodium beef broth: The broth is where the rice gets its savory flavor. Low-sodium is important because the tomatoes and seasoning add salt too. If you only have regular broth, hold back on adding extra salt until the end. You can always add more, but you can’t take it out.
- 1 teaspoon paprika: This adds a mild, sweet smokiness that kids tend to love. It’s not spicy at all. Smoked paprika is even better if you have it.
- 1/2 teaspoon dried oregano: Oregano brings a little herbal note that makes the dish feel more complex than it is. It’s subtle, but you’d notice if it were missing.
- 1/2 teaspoon salt (or to taste): Salt is crucial for bringing out all the other flavors. Start with this amount and adjust at the end. Remember that the broth and tomatoes already contain salt.
- 1/4 teaspoon black pepper: A little bit goes a long way. This adds a gentle warmth without any heat.
- 1 cup frozen peas or corn (optional): This is my secret weapon for sneaking in vegetables. The peas add a pop of sweetness and color that kids actually like. I’ve used frozen mixed vegetables too. Just stir them in at the end so they warm through but stay bright.
- Fresh parsley or grated Parmesan cheese for garnish (optional): This is purely for looks, but a little sprinkle of green or cheese makes the dish feel more special. My kids love the “sprinkle cheese” as they call it.
Ingredient Selection Tip: For the best texture, I recommend using a good quality beef broth like Pacific Foods or Swanson. The cheaper broths can be watery and lack flavor. And for the rice, stick with a brand you trust—I’ve had good luck with Carolina or Zatarain’s long-grain rice.
Equipment Needed
The beauty of this recipe is that it doesn’t require a kitchen full of gadgets. You probably already own everything you need, which is exactly how weeknight cooking should be.
- Large, deep skillet or Dutch oven (12-inch with a lid): This is your main tool. A deep skillet with high sides prevents splattering and gives you room to stir without flinging rice everywhere. A Dutch oven works beautifully too. If you don’t have a lid, you can use a baking sheet or aluminum foil to cover it tightly. I’ve used my trusty cast iron Dutch oven for years, and it distributes heat evenly, which helps the rice cook without burning.
- Wooden spoon or silicone spatula: You need something sturdy to break up the ground beef as it browns. A wooden spoon won’t scratch your pan and gives you good leverage. A silicone spatula is great for scraping up any browned bits from the bottom.
- Sharp knife and cutting board: For dicing the onion and mincing the garlic. A sharp knife makes the job faster and safer. Dull knives are more likely to slip.
- Measuring cups and spoons: Accuracy matters here, especially for the rice and liquid. Using the wrong ratio can lead to mushy or crunchy rice. I keep a set of dry measuring cups for rice and a liquid measuring cup for broth.
- Can opener: For the diced tomatoes. A simple handheld one works just fine.
- Colander (optional): Only if you need to drain excess fat from the beef. I usually just tilt the pan and spoon out the extra fat, which saves on dishes.
Budget-Friendly Tip: You don’t need a fancy, expensive skillet for this recipe. A basic non-stick skillet with a lid from a discount store will work perfectly. I started with a $15 pan from Target, and it served me well for years. Just make sure it’s deep enough to hold everything without overflowing.
Preparation Method
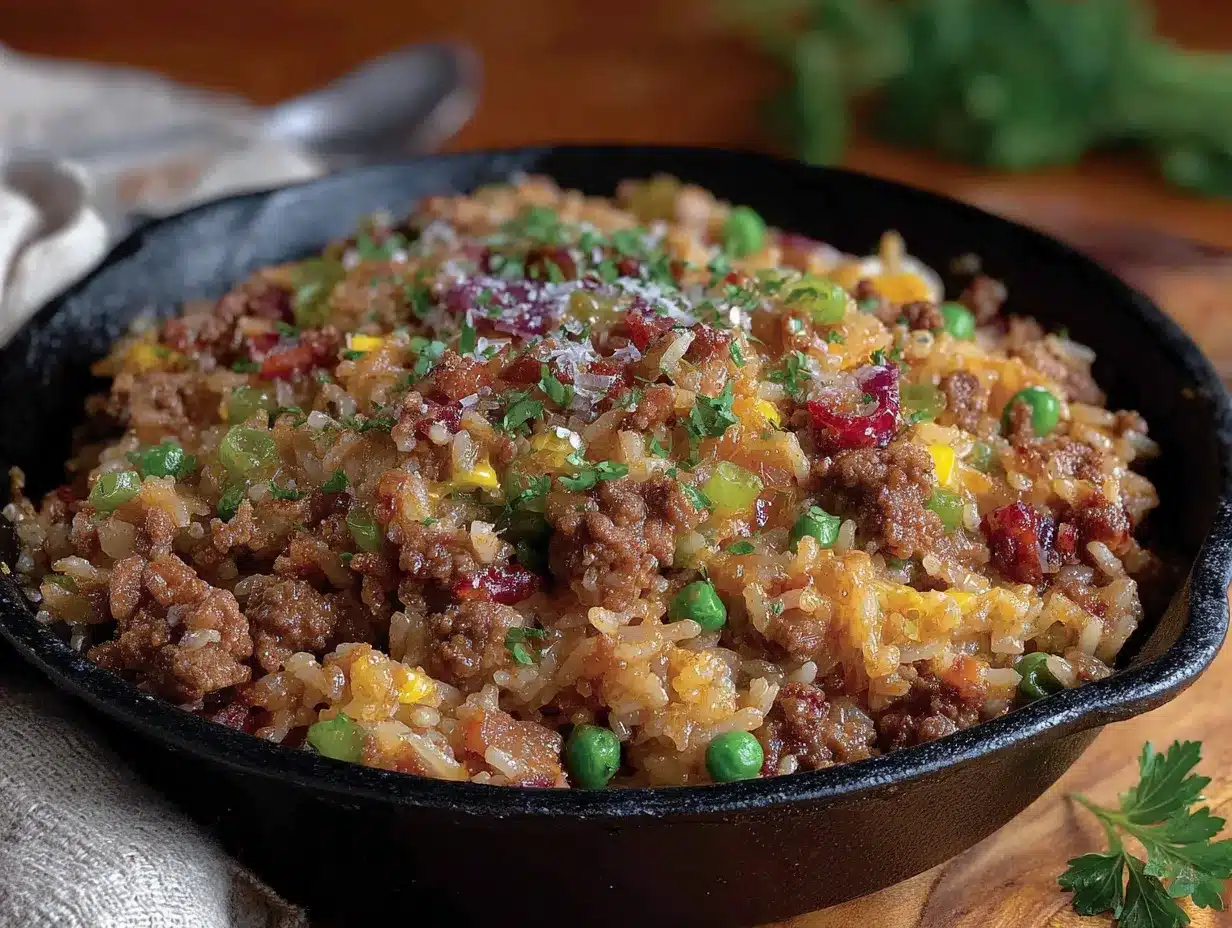
Here’s where the magic happens. Follow these steps, and you’ll have a steaming, delicious skillet dinner that the whole family will love. I’ve included all the little details I wish someone had told me the first time I made this.
- Prep your ingredients first. Dice the onion, mince the garlic, and measure out the rice, broth, and spices. Having everything ready before you start cooking makes the process smooth and stress-free. Trust me, you don’t want to be chopping an onion while the beef is burning.
- Heat the olive oil in your large skillet over medium-high heat. Let it warm up for about 30 seconds until it shimmers. If you see smoke, the pan is too hot—turn it down a notch.
- Add the ground beef to the hot skillet. Break it up with your wooden spoon into small, bite-sized pieces. Let it cook undisturbed for about 3-4 minutes to get a nice brown crust on one side. This browning is where the flavor lives. Stir it occasionally after that, breaking up any large clumps. Cook for another 3-4 minutes until the beef is no longer pink. Sensory cue: You should hear a satisfying sizzle, and the kitchen will start smelling like a diner.
- Drain off excess fat. If there’s more than a tablespoon of fat in the pan, carefully tilt the skillet and spoon out the extra or use a colander. Don’t drain it all—you need a little bit to cook the onion. I usually leave about a tablespoon in the pan.
- Add the diced onion to the skillet with the beef. Cook for 3-4 minutes, stirring occasionally, until the onion is soft and translucent. It should look like it’s sweating, not browning too much. If it starts to darken quickly, lower the heat to medium.
- Stir in the minced garlic, paprika, oregano, salt, and pepper. Cook for about 30 seconds until the garlic is fragrant. Don’t skip this step—cooking the spices in the fat wakes up their flavors. Warning: Garlic burns fast, so keep stirring and don’t walk away.
- Add the uncooked rice to the pan. Stir it into the beef and onion mixture for about 1 minute. This toasts the rice slightly, which helps it stay fluffy and prevents it from turning into mush. You’ll notice the rice grains start to look a little more opaque.
- Pour in the diced tomatoes (with their juices) and the beef broth. Stir everything together, scraping the bottom of the pan to release any browned bits. Those bits are pure flavor gold.
- Bring the mixture to a boil over high heat. Once it’s bubbling, immediately reduce the heat to low, cover the skillet with a tight-fitting lid, and let it simmer. Time estimate: 18-20 minutes for white rice. Do not lift the lid during this time! I know it’s tempting, but the steam is what cooks the rice. Peeking releases that steam and can lead to uneven cooking.
- After 18 minutes, remove the skillet from the heat (keep the lid on) and let it sit for 5 minutes. This resting time allows the rice to absorb any remaining liquid and fluff up. If you have frozen peas or corn, stir them in now, replace the lid, and let them warm through during the resting period.
- Remove the lid and fluff the rice gently with a fork. Taste a little bit of the rice to make sure it’s tender. If it’s still a bit crunchy, add 2-3 tablespoons of water, replace the lid, and let it sit on low heat for another 5 minutes.
- Serve immediately while it’s hot. Garnish with fresh parsley or a sprinkle of Parmesan cheese if you’re feeling fancy. Scoop it into bowls and watch it disappear.
Personal Tip: I always set a timer on my phone for the simmering time. It’s too easy to get distracted by laundry or a kid’s question and overcook the rice. The timer keeps me honest.
Cooking Tips & Techniques
After making this dish more times than I can count, I’ve collected a few tricks that separate a good skillet from a great one. Some of these I learned from my own mistakes, and some I picked up from watching other cooks.
Don’t rush the browning. I know you’re in a hurry, but letting the beef sit in the pan for a few minutes without stirring is what creates those deep, savory flavors. If you constantly stir, the beef steams instead of browns. Let it get a little crusty. That crust is where the flavor lives.
Use the right rice. Long-grain white rice is your safest bet. I once tried this recipe with jasmine rice, and it worked beautifully. But when I used short-grain sushi rice out of desperation, it turned into a sticky, gummy mess. Save the short-grain for your sushi rolls. Also, do not use instant rice—it will turn to mush. Trust me on this one.
Check your liquid levels. The ratio of 2 cups of liquid (broth plus the juices from the tomatoes) to 1 cup of rice is almost foolproof. But different pans evaporate at different rates. If you have a wide skillet that lets off a lot of steam, you might need an extra 1/4 cup of broth. If your lid doesn’t fit tightly, the same rule applies. After you’ve made this once, you’ll know if your pan needs a little adjustment.
My biggest failure: The first time I made this, I lifted the lid three times to check on the rice. Each time, I let out a puff of steam, and the rice ended up undercooked and crunchy. I served it anyway, and my kids complained that it was “too bitey.” Now I keep the lid on no matter what. Learn from my impatience.
Multitasking strategy: While the rice is simmering, use that 20 minutes to clean up your cutting board, wipe down the counters, or set the table. If you have kids, this is a great time to have them put out plates and forks. By the time the skillet is ready, your kitchen is almost clean, and you can sit down to dinner without looking at a mess.
Variations & Adaptations
This recipe is a fantastic base that you can tweak based on what you have in your pantry or what your family likes. Here are a few variations I’ve tried and loved.
Cheesy Ground Beef and Rice Skillet: After the rice is cooked and resting, stir in 1 cup of shredded cheddar cheese or Monterey Jack. The cheese melts into the rice and creates a creamy, indulgent dish that kids absolutely adore. I’ve also used a handful of mozzarella, and it was wonderfully stretchy. Just be aware that this version is richer and might be better as an occasional treat.
Mexican-Style Skillet: Swap the oregano for 1 teaspoon of ground cumin and add 1/2 teaspoon of chili powder. Use fire-roasted diced tomatoes and stir in a can of drained and rinsed black beans along with the peas or corn. Serve with a dollop of sour cream and a sprinkle of chopped cilantro. This version is a little more exciting for adults, but my kids still eat it without complaint.
Brown Rice Version: If you prefer brown rice, you can absolutely use it. Just know that it requires more liquid and a longer cooking time. Use 2 1/2 cups of broth instead of 2 cups, and simmer for 40-45 minutes instead of 18-20. Check it at the 40-minute mark and add a splash of water if needed. The texture will be chewier and nuttier, which I personally love.
Low-Carb/Keto Adaptation: Replace the rice with 2 cups of riced cauliflower (fresh or frozen). Cook the cauliflower separately in a microwave or pan, then stir it into the beef mixture at the end. This version is lighter and lower in carbs, but it’s still satisfying. My husband, who is not low-carb, actually requested this version the other night, so it’s a winner for everyone.
Spicy Kick for Adults: Add a diced jalapeño along with the onion, or stir in 1/2 teaspoon of red pepper flakes with the spices. This gives the dish a gentle heat that the kids can avoid by picking around the peppers. I sometimes add a squirt of sriracha to my own bowl after serving.
Serving & Storage Suggestions
This skillet is a complete meal on its own, but a few simple sides can round it out beautifully. Here’s how I like to serve it and how to handle leftovers.
Serving Suggestions: Serve the ground beef and rice skillet hot, straight from the pan. It’s hearty enough to be a one-dish meal, but if you want to stretch it, pair it with a simple green salad dressed with lemon and olive oil. The acidity of the salad balances the richness of the skillet. You can also serve it with warm tortillas or crusty bread for scooping up every last bit. For a vegetable side, steamed broccoli or green beans work wonderfully. My kids love it with a side of buttered corn on the cob in the summer.
Storage Instructions: Let any leftovers cool completely before storing. Transfer the cooled skillet to an airtight container and refrigerate for up to 4 days. The flavors actually meld together overnight, so leftovers taste even better the next day. I often double the recipe on purpose just to have lunches for the week.
Freezer Instructions: This dish freezes beautifully. Portion it into individual freezer-safe containers or a large freezer bag. Press out as much air as possible before sealing. It will keep in the freezer for up to 3 months. Thaw overnight in the refrigerator before reheating.
Reheating Methods: The best way to reheat this is in a skillet over medium-low heat with a splash of water or broth. Stir occasionally until heated through, about 5-7 minutes. This method restores the texture better than the microwave. If you’re in a rush, microwave individual portions in 30-second bursts, stirring between each, until hot. Add a tablespoon of water to keep it from drying out.
Flavor Development: I’ve noticed that this dish is at its peak about 24 hours after cooking. The rice continues to absorb the flavors, and the whole thing becomes more cohesive. So don’t be sad if you have leftovers—you’re in for a treat the next day.
Nutritional Information & Benefits
While this is comfort food at its core, it also offers some solid nutritional benefits that make it a smart choice for family dinners. Here’s a rough breakdown per serving (based on 6 servings, without optional cheese or peas).
- Calories: Approximately 380-420
- Protein: 25-28 grams
- Carbohydrates: 35-40 grams
- Fat: 14-18 grams
- Fiber: 2-3 grams
- Iron: 15% of the Daily Value
Health Benefits: Ground beef is an excellent source of high-quality protein and iron, which is essential for energy and healthy blood. The rice provides carbohydrates for fuel, making this a great meal for active kids. The tomatoes are rich in lycopene, an antioxidant that supports heart health. If you add the peas or corn, you’re also getting a serving of vegetables and some extra fiber. This is a balanced meal that keeps everyone full and satisfied without being overly heavy.
Dietary Considerations: This recipe is naturally gluten-free (just double-check your broth label for hidden gluten). It’s also nut-free and egg-free, making it safe for many common allergies. To make it dairy-free, simply skip the optional Parmesan cheese. For a lower-sodium version, use no-salt-added broth and tomatoes, and adjust the added salt to taste.
Personal Wellness Perspective: I love that this meal feels indulgent but is actually quite balanced. It’s the kind of dinner that gives you energy without making you feel sluggish. When I serve this, I know my kids are getting protein, carbs, and a little bit of veg, all in one bowl. That’s a win in my book.
Conclusion
This one-pan ground beef and rice skillet is more than just a recipe. It’s a solution for those nights when you’re tired, the kids are hungry, and the pantry looks like a ghost town. It’s proof that you don’t need fancy ingredients or complicated techniques to put a delicious, satisfying meal on the table. All you need is a little bit of patience, a single pan, and the willingness to try something simple.
I love this recipe because it never lets me down. It’s forgiving, adaptable, and always, always delicious. It’s the meal I turn to when I need a win, and it delivers every single time. I hope it becomes that for you too.
Now I want to hear from you. Have you tried this skillet? Did your kids go back for seconds? Did you add your own twist? Drop a comment below and let me know how it went. And if you have a go-to weeknight dinner that saves you on the hard days, share that too. We’re all in this together, and the best recipes are the ones we pass along. Happy cooking, friends!
Frequently Asked Questions
Can I use ground turkey or chicken instead of beef?
Absolutely. Ground turkey or chicken work well in this recipe. Just keep in mind that they are leaner, so you may need to add a tablespoon of olive oil to keep the rice from drying out. The flavor will be milder, so consider adding a little extra paprika or a splash of Worcestershire sauce for depth.
Why is my rice still crunchy after 20 minutes?
This usually happens for one of three reasons: the lid wasn’t tight enough (steam escaped), the heat was too low, or you lifted the lid during cooking. If your rice is crunchy, add 2-3 tablespoons of water, replace the lid tightly, and cook on low for another 5 minutes. Check again and repeat if needed.
Can I make this in a slow cooker or Instant Pot?
Yes, with adjustments. For the Instant Pot, use the sauté function to brown the beef and onion, then add the remaining ingredients (use 1 3/4 cups broth instead of 2). Pressure cook on high for 5 minutes, then let the pressure release naturally for 10 minutes. For a slow cooker, brown the beef first, then add everything to the slow cooker and cook on low for 2-3 hours. The rice may be softer in the slow cooker, so check it at the 2-hour mark.
How can I make this recipe more flavorful for adults?
There are several easy ways to amp up the flavor. Add a splash of Worcestershire sauce or soy sauce along with the broth. Stir in a tablespoon of tomato paste after cooking the garlic. You can also add a bay leaf during simmering (remove it before serving) or finish the dish with a squeeze of fresh lemon juice. These small additions make a big difference without complicating the recipe.
Can I double this recipe?
Yes, but you’ll need a very large pan or Dutch oven. If you double it, use a 14-inch skillet or a large pot. The cooking time may increase slightly—check the rice at the 22-minute mark. You can also split the recipe between two pans if you don’t have a single large enough vessel. Leftovers freeze beautifully, so doubling is a great meal prep strategy.
Pin This Recipe!

Best One-Pan Ground Beef and Rice Skillet for Kids

A quick and easy one-pan ground beef and rice skillet that comes together in about 30 minutes using simple ingredients. Perfect for busy weeknights, this family-friendly meal is a crowd-pleaser that even picky kids will love.
- Prep Time: 10 minutes
- Cook Time: 25 minutes
- Total Time: 35 minutes
- Yield: 6 servings 1x
- Category: Main Course
- Cuisine: American
Ingredients
- 1 pound ground beef (80/20 or 85/15)
- 1 tablespoon olive oil
- 1 medium yellow onion, diced
- 2 cloves garlic, minced
- 1 cup long-grain white rice, uncooked
- 1 can (14.5 ounces) diced tomatoes, undrained
- 2 cups low-sodium beef broth
- 1 teaspoon paprika
- 1/2 teaspoon dried oregano
- 1/2 teaspoon salt (or to taste)
- 1/4 teaspoon black pepper
- 1 cup frozen peas or corn (optional)
- Fresh parsley or grated Parmesan cheese for garnish (optional)
Instructions
- Prep your ingredients first. Dice the onion, mince the garlic, and measure out the rice, broth, and spices.
- Heat the olive oil in your large skillet over medium-high heat until shimmering.
- Add the ground beef to the hot skillet. Break it up with a wooden spoon and let it cook undisturbed for 3-4 minutes to brown. Stir occasionally and cook for another 3-4 minutes until no longer pink.
- Drain off excess fat, leaving about 1 tablespoon in the pan.
- Add the diced onion and cook for 3-4 minutes until soft and translucent.
- Stir in the minced garlic, paprika, oregano, salt, and pepper. Cook for about 30 seconds until fragrant.
- Add the uncooked rice and stir for 1 minute to toast slightly.
- Pour in the diced tomatoes (with juices) and beef broth. Stir, scraping the bottom of the pan to release browned bits.
- Bring to a boil over high heat, then reduce heat to low, cover tightly, and simmer for 18-20 minutes. Do not lift the lid.
- Remove from heat (keep lid on) and let rest for 5 minutes. If using frozen peas or corn, stir them in now and let warm through during resting.
- Remove lid and fluff rice with a fork. If rice is still crunchy, add 2-3 tablespoons water, cover, and cook on low for another 5 minutes.
- Serve immediately, garnished with parsley or Parmesan if desired.
Notes
For best results, use long-grain white rice and do not lift the lid during simmering. The recipe is forgiving and can be adapted with different proteins or add-ins. Leftovers taste even better the next day.
Nutrition
- Serving Size: 1 serving (about 1.5
- Calories: 400
- Sugar: 4
- Sodium: 580
- Fat: 16
- Saturated Fat: 5
- Carbohydrates: 38
- Fiber: 3
- Protein: 26
Keywords: ground beef, rice, one-pan, skillet, weeknight dinner, kid-friendly, easy dinner, family meal


